 Deep Learning frameworks
The interest on deep-learning has been growing enormous in the past couple of months but in order to get started we need a stable development environment. I find many beginners facing problems while installing libraries and setting up environment. As i have faced first time when i was trying. So this guide is totally for beginners.
Installation Setup
We will cover the following steps:
- Install Anaconda & Python
- Install/ Update GPU Drivers
- Install CUDA Toolkit & cuDNN
- Add Environment Variables to the PATH in Windows
- Install TensorFlow & Keras
- Verify the package run
(Step-1) Installation of Anaconda
In this step, kindly download the Anaconda Python package manager for your platform (Windows/Linux) and install it accordingly.
https://www.anaconda.com/products/distribution
(Step-2) Install GPU Drivers — CUDA 10.1 requires 418.x or higher
Now, Choose your appropriate graphics driver and install it, I recommend you to update to the latest version for better performance.
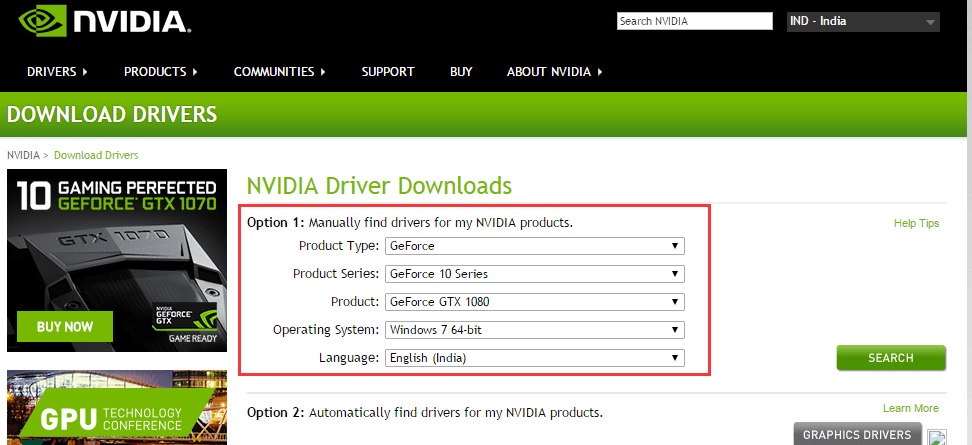 nvidia driver download
NVIDIA Drivers: https://www.nvidia.com/Download/index.aspx?lang=en-us
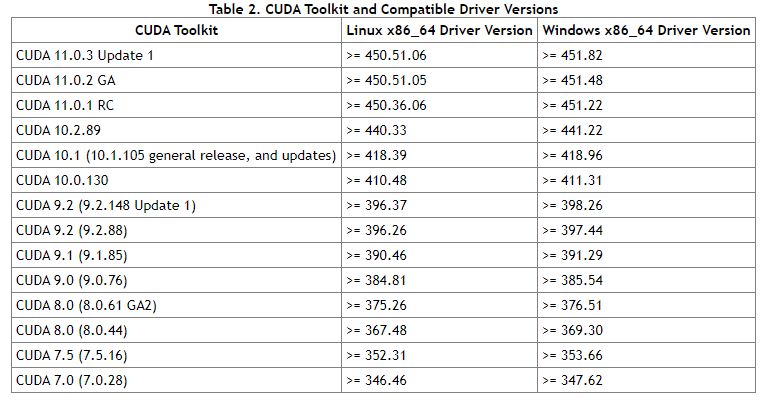
(STEP-3) Install CUDA Toolkit — TensorFlow supports CUDA 10.1 (TensorFlow >= 2.1.0)
 cuda toolkit download
Note:Kindly choose the CUDA version according to your Nvidia GPU version to avoid errors.
Note: Kindly choose the CUDA version according to your Nvidia GPU version to avoid errors.
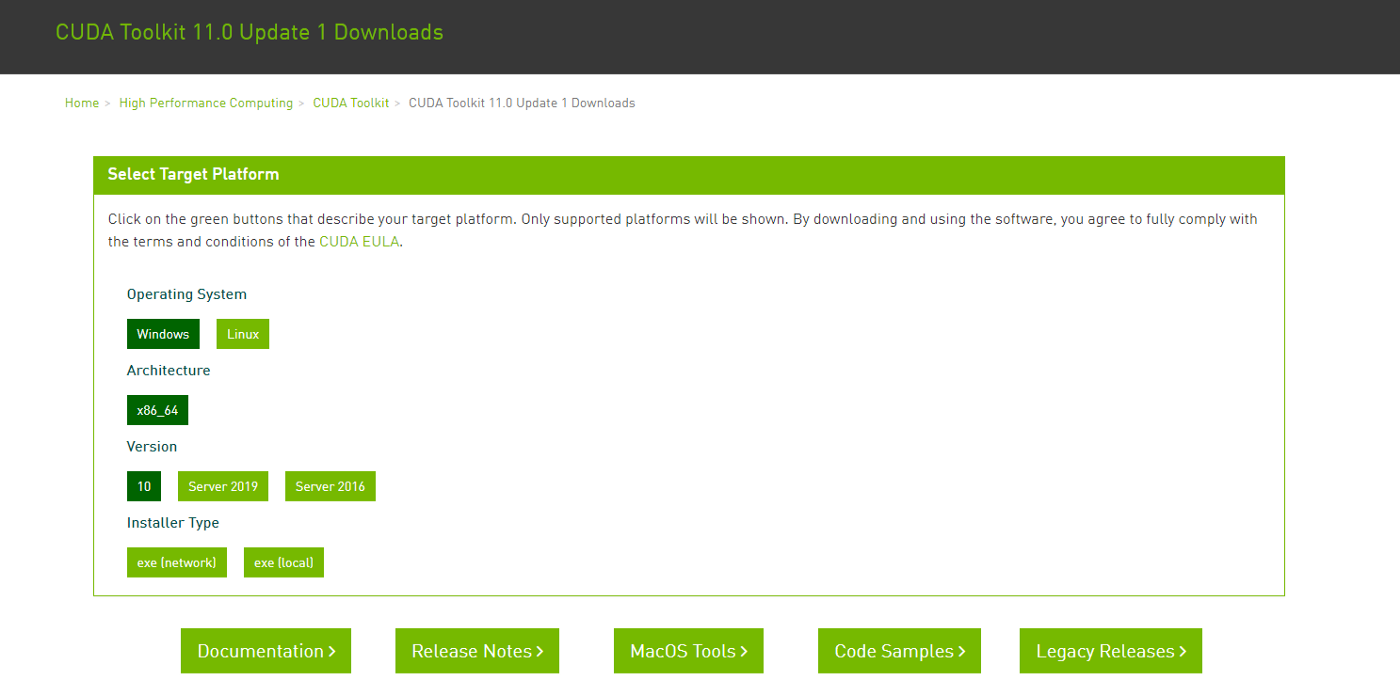
- Choose the desired platform and download it Cuda Toolkit
Make sure you have the right CUDA version and drivers installed else the setup won’t work!
- Install CUDA Toolkit with default settings and usually it takes time so bare with it!
 cuda toolkit
(Step-4) Adding Cudnn libraries
Cudnn libraries provide accelerated performance on GPU usage, so we need to add it in for smoother and efficient performance.
https://developer.nvidia.com/cudnn-download-survey
It will prompt you to create an account, go ahead and sign up and download the appropriate version for your platform.
Now extract the Cudnn libraries zip file and copy all the files to
“C:\Program Files\NVIDIA GPU Computing Toolkit\CUDA\v10.2”
location and overwrite the files on that location.
(Step-5) Add Environment Variables to the PATH in Windows
- Open Run using (Win + R) and type sysdm.cpl and press Enter
- Under System Properties, please select the Tab Advanced.
- In Environment Variables go to System variables
- Click on Add and save the below path,
- Click ok and Save it.
Variable name = CUDA_PATH
Variable value = C:\Program Files\NVIDIA GPU Computing Toolkit\CUDA\v10.0
(Step-6) Install TensorFlow & Keras
Open command prompt and type in,
1
pip install tensorflow-gpu
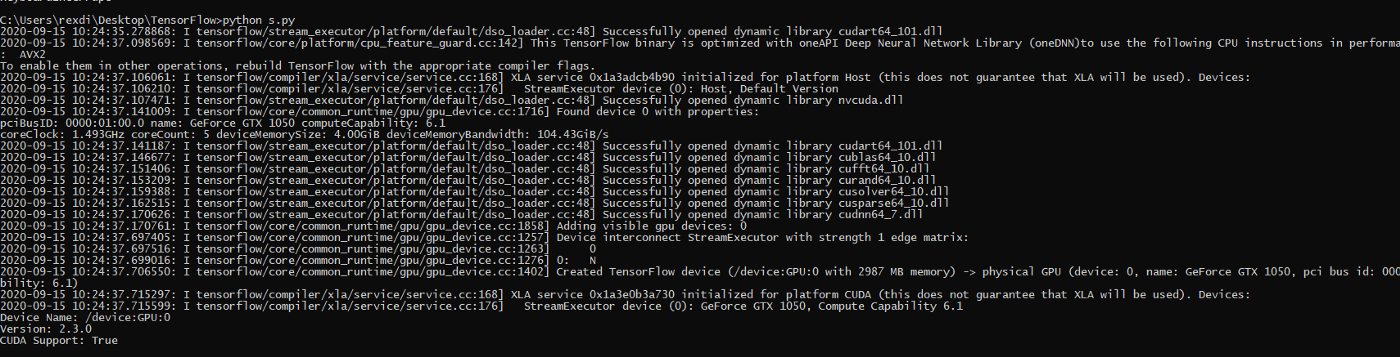
After successful installation try running this below program to verify its successful setup.
1
2
3
4
5
6
7
import tensorflow as tf
# Device Name
print('Device Name: '+tf.test.gpu_device_name()
# Version-check
print('Version: '+tf.__version__)
# CUDA Support
print('CUDA Support: '+str(tf.test.is_built_with_cuda()))
 cuda tf_setup
If you face any library missing issue then kindly download the below zip extract it and paste it over
https://drive.google.com/file/d/10kKz9YRRmTtMj4vZHTt8fNrrrbgD2ooU/view?usp=sharing
C:\Windows\System32
In case u need packages and setup directly, then you can refer my Github Repo
https://github.com/rexdivakar/Deep-Learning-Setup
Congratulations! 😉 You have successfully created an environment for using TensorFlow, Keras (with Tensorflow backend) over GPU on Windows!